3D scanning and 3D printing may sound like a natural match for one another, but they don’t always play together as easily and nicely as one would hope. I’ll explain what one can expect by highlighting three use cases the average hacker encounters, and how well they do (or don’t) work. With this, you’ll have a better idea of how 3D scanning can meet your part design and 3D printing needs.
How Well Some Things (Don’t) Work
Most 3D printing enthusiasts sooner or later become interested in whether 3D scanning can make their lives and projects easier. Here are a three different intersections of 3D scanning, 3D printing, and CAD along with a few words on how well each can be expected to work.
Goal
Examples and Details
Does it work?
Use scans to make copies of an object.
3D scan something, then 3D print copies.
Objects might be functional things like fixtures or appliance parts, or artistic objects like sculptures.
Mostly yes, but depends on the object
Make a CAD model from a source object.
The goal is a 1:1 model, for part engineering purposes.
Use 3D scanning instead of creating the object in CAD.
Not Really
Digitize inconvenient or troublesome shapes.
Obtain an accurate model of complex shapes that can’t easily be measured or modeled any other way.
Examples: dashboards, sculptures, large objects, objects that are attached to something else or can’t be easily moved, body parts like heads or faces, and objects with many curves.
Useful to make sure a 3D printed object will fit into or on something else.
Creating a CAD model of a part for engineering purposes is not the goal.
Yes, but it depends
In all of these cases, one wants a 3D model of an object, and that’s exactly what 3D scanning creates, so what’s the problem? The problem is that not all 3D models are alike and useful for the same things.
3D Scanning Makes Meshes, Not CAD Models
Broadly speaking, there are two kinds of 3D models: CAD models, and meshes. These can be thought of as being useful for engineering purposes and artistic purposes, respectively. Some readers may consider that a revolting oversimplification, but it is a helpful one to make a point about how 3D scanning, 3D printing, and CAD work do (and don’t) work together.
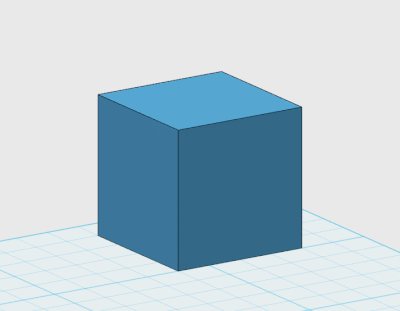
Hackers designing parts are typically most interested in CAD models, because these represent real-world objects that get modified in terms of real-world measurements. But 3D scanning will not create a CAD model; it will create a mesh.
Typical CAD model editing example, showing a model as a solid object, altered in terms of geometric features and real-world measurements.
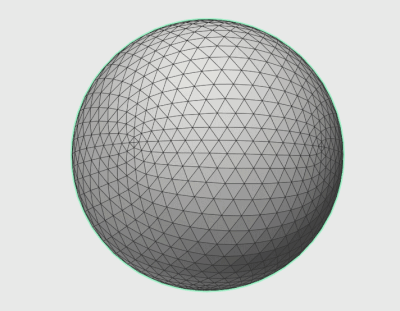
A typical mesh editing operation. The object is a network of points connected into a mesh, which can be manipulated and deformed.
Meshes can be used for engineering purposes — .stl files are meshes after all, and are practically synonymous with 3D printing — but a mesh cannot be modified in the the same ways a CAD file can. With a mesh, one does not extrude a face by a specific number of millimeters, nor does one fillet a corner to a specific radius. Meshes can absolutely be modified, but the tools and processes are different.
To sum up: 3D scanning makes 3D models from real-world objects, but the models that come out of the scanning process aren’t necessarily suitable for engineering purposes without additional work.
Options for the Home-based Hacker
At the beginning of this article I selected three typical intersections of 3D scanning, 3D printing, and CAD work to illustrate the various imperfect fits between them. Now I’ll go into those three use cases in more detail, and provide ways for the average hacker to use 3D scanning to make a project easier.
Using 3D Scanning to Create Copies
Photogrammetry is an accessible way to create 3D models, and free as well as paid options exist. Generally, the smaller and more complex an object, the harder it will be to obtain a result that preserves all the features and details.
Photogrammetry uses multiple photos of an object taken from a variety of different angles, and software interprets these photos to create a point cloud representing the surface of the object. A mesh 3D model representing the object can then be generated. Some cleanup or post-processing of the model is usually required, depending on the method and software.
This blog post from Prusa Research walks through how to get the best results with Meshroom, a free option for 3D scanning using photogrammetry.
OpenScan (and OpenScan Mini) is a DIY project by [Thomas Megel] aimed at using photogrammetry to scan small objects with high accuracy.
RealityCapture is non-free software with a number of useful features and well-made tutorials. Notably, they have a license model option aimed at occasional use and small quantities. Since most software subscription models rarely make sense for hobbyists and one-off projects, it can be worth a look.
Creating a CAD Model from a 3D Scan
Since 3D scanning will not generate a CAD model, it’s not a direct alternative to designing a part in CAD. Most CAD programs allow importing a mesh, but the imported mesh remains a mesh, which cannot be modified in the same way as other CAD objects. It might be useful as a guide for a new design, however.
A mesh converted to a solid will become an object made up of collection of triangular faces, identical to the ones that made up the original mesh. This is rarely what a novice CAD modeler expects.
One may wonder if it is possible to convert from one format to another. It is, but the conversion may not be what one expects. Converting a CAD model into a mesh is simple enough, but converting a mesh into a CAD solid is less straightforward.
If one’s goal is to use 3D scanning to make the creation of a CAD model easier and the conversion result shown here won’t do the trick, the next best thing is to use the 3D scan as a master and model a new part around it to match, using the imported mesh as a guide. One project that uses this approach is this custom trackball designed around a molded ergonomic prototype.
Some professional software suites have the ability to export to CAD, but the essential workflow is the same, with a scanned mesh being used as the reference for a new design.
3D Scanning to Digitize Inconvenient or Troublesome Shapes
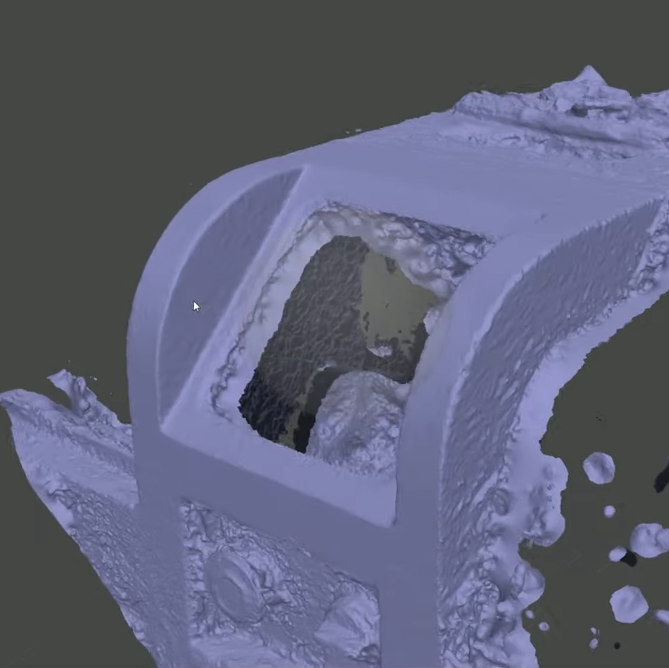
This scan of a laser cutter’s panel is obviously only part of the whole machine, but the important part is present.
Sometimes an accurate 3D model of a shape is needed, and that shape isn’t easily modeled or measured by hand. The same photogrammetry tools mentioned earlier are useful here, but their purpose is different. Instead of modeling the object from top to bottom to make an accurate copy, often only part of the object is needed.
For example, modeling the shape of an equipment panel or dashboard requires only the relevant section to be scanned successfully. A person’s head can be scanned to ensure a precise fit for a helmet or mask, and there’s no need to get a full scan of the entire body. In general, fewer pictures are needed and post-processing and model cleanup is easier because there is a smaller area of interest. A size reference must be included somehow for scaling later, because most 3D scans do not intrinsically create 1:1 models.
An excellent example of this approach is this project to design a custom control panel intended to fit an existing piece of equipment. Unlike when scanning a whole object with the intent of duplicating it, there’s no need to capture difficult-to-reach places like the bottom or back. This makes both scanning and model cleanup easier.
Professional Scanning
Another option is to pay for a professional scan. Fancy scanners and software suites costing thousands, or tens of thousands, of dollars and aimed at engineering applications exist, and while they are out of the reach of the average hacker, paying for a company to do a scan or two might not be.
Accuracy and resolution can be beyond what’s possible with photogrammetry, and some of the professional software suites have fancy features like aligning multiple scans, accurate size references, or the ability to generate CAD models based on scan results.
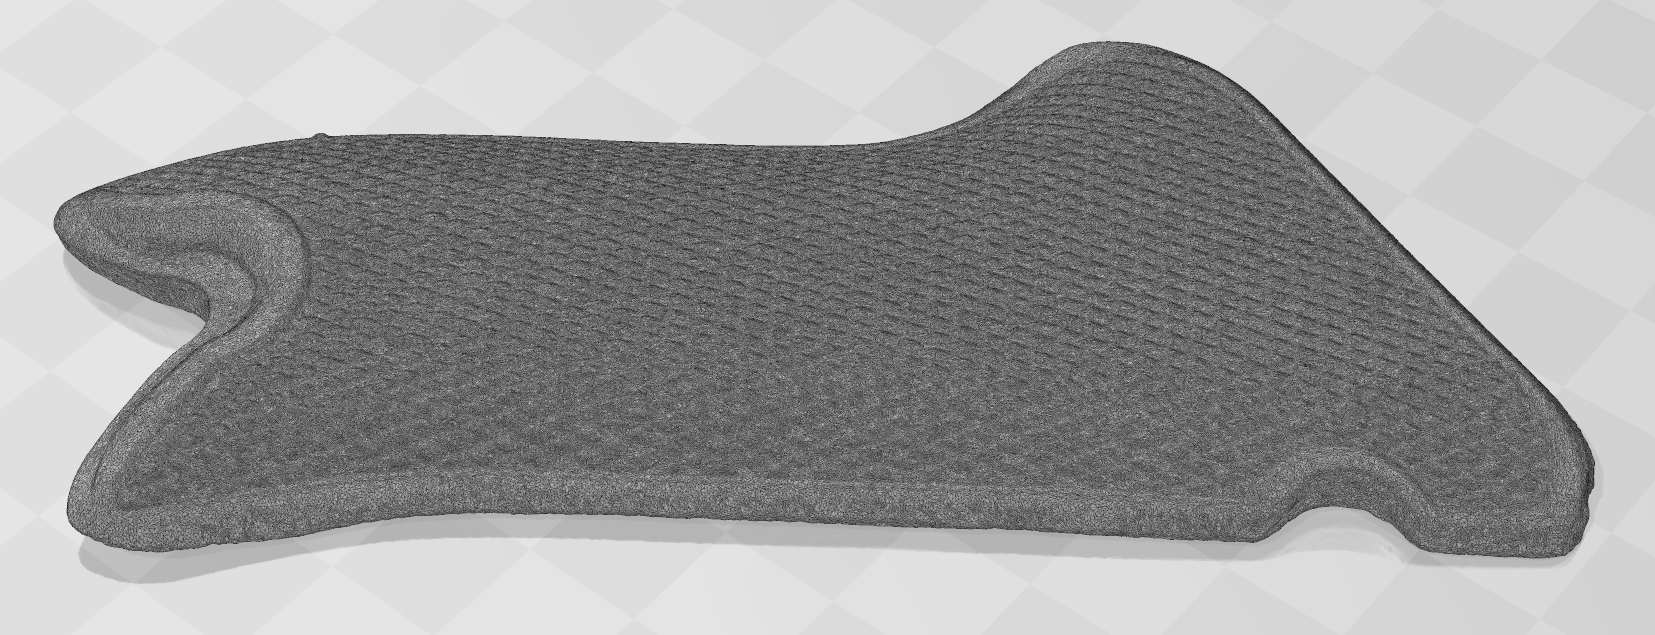
A 1:1 model from a professional 3D scanning tool, the product of aligning and merging multiple separate scans from different angles to get a complete model. It is still a mesh, but it accurately represents the original in both features and scale.
Shown here is the model of a part I had professionally scanned with a Creaform HandySCAN Black 3D scanner, according to my invoice. It is an old wood grip from an antique firearm. The scan still created a mesh, but it was an accurate 1:1 model of the original that I was able to use to print replacements on an SLA 3D printer.
When getting a quote for professional 3D scanning, be sure to ask about fee structure and be clear about your needs. In my case, it was cost-effective to scan multiple similar objects under a single setup fee.
Know What 3D Scanning Can (and Can’t) Do
3D scanning is getting better and more accessible all the time, but the fact that it generates a mesh means it doesn’t always fit smoothly into a 3D printing and CAD part design workflow. That doesn’t mean it can’t be useful, but it does mean that it’s important to know the limitations, and how they will affect your needs.
Of course, one can always dig out the calipers and manually model a part in CAD, but not all parts and shapes are easily measured or reverse-engineered. 3D scanning is a great alternative to modeling complex, real-world objects that would be impractical or error-prone to create by hand.
Have you successfully used 3D scanning to make a project easier, or have a favorite method or tool to share? We definitely want to hear all about it, so please take a moment to share with us in the comments.